Showing posts with label stamping. Show all posts

Thursday, April 25, 2013

You are a BADASS card


So this is totally a salvaged card. You can kind of tell in the lower right corner in the gray, there are some faint lighter squares. This was going to be a modern, simple, stylish card to give to a total badass. That didn’t work out quite so much.
 
On the sentiment: when I made this, I was trying to think of a card that said something that I really wanted to receive. And I came up with this because it's fun, not overly sweet, and still complimentary. 


So I started out writing BAD-ASS out by hand, and using a gold pen to make a neat pattern of squares near the bottom of the card.  Unfortunately I also wrote, “I think you’re a…” near the top of the card and hated it, so I decided to fix it by masking off the center of the card and inking the rest of the card so it would be a medium gray-color.


Then I spent some time trying to figure out some stripes of paper that I liked together here. I inked the striped pattern darker, so it wouldn’t be such a strong visual element. Then I spent time arranging it all (and rearranging it!) Then I added all of the embellishments on top.


I made these leaf embellishments myself with a leaf stamp from Martha Stewart on tan Recollections cardstock and then cut them all out by hand. I popped a few of them up with foam tape to make the bunches more interesting without being overwhelming.
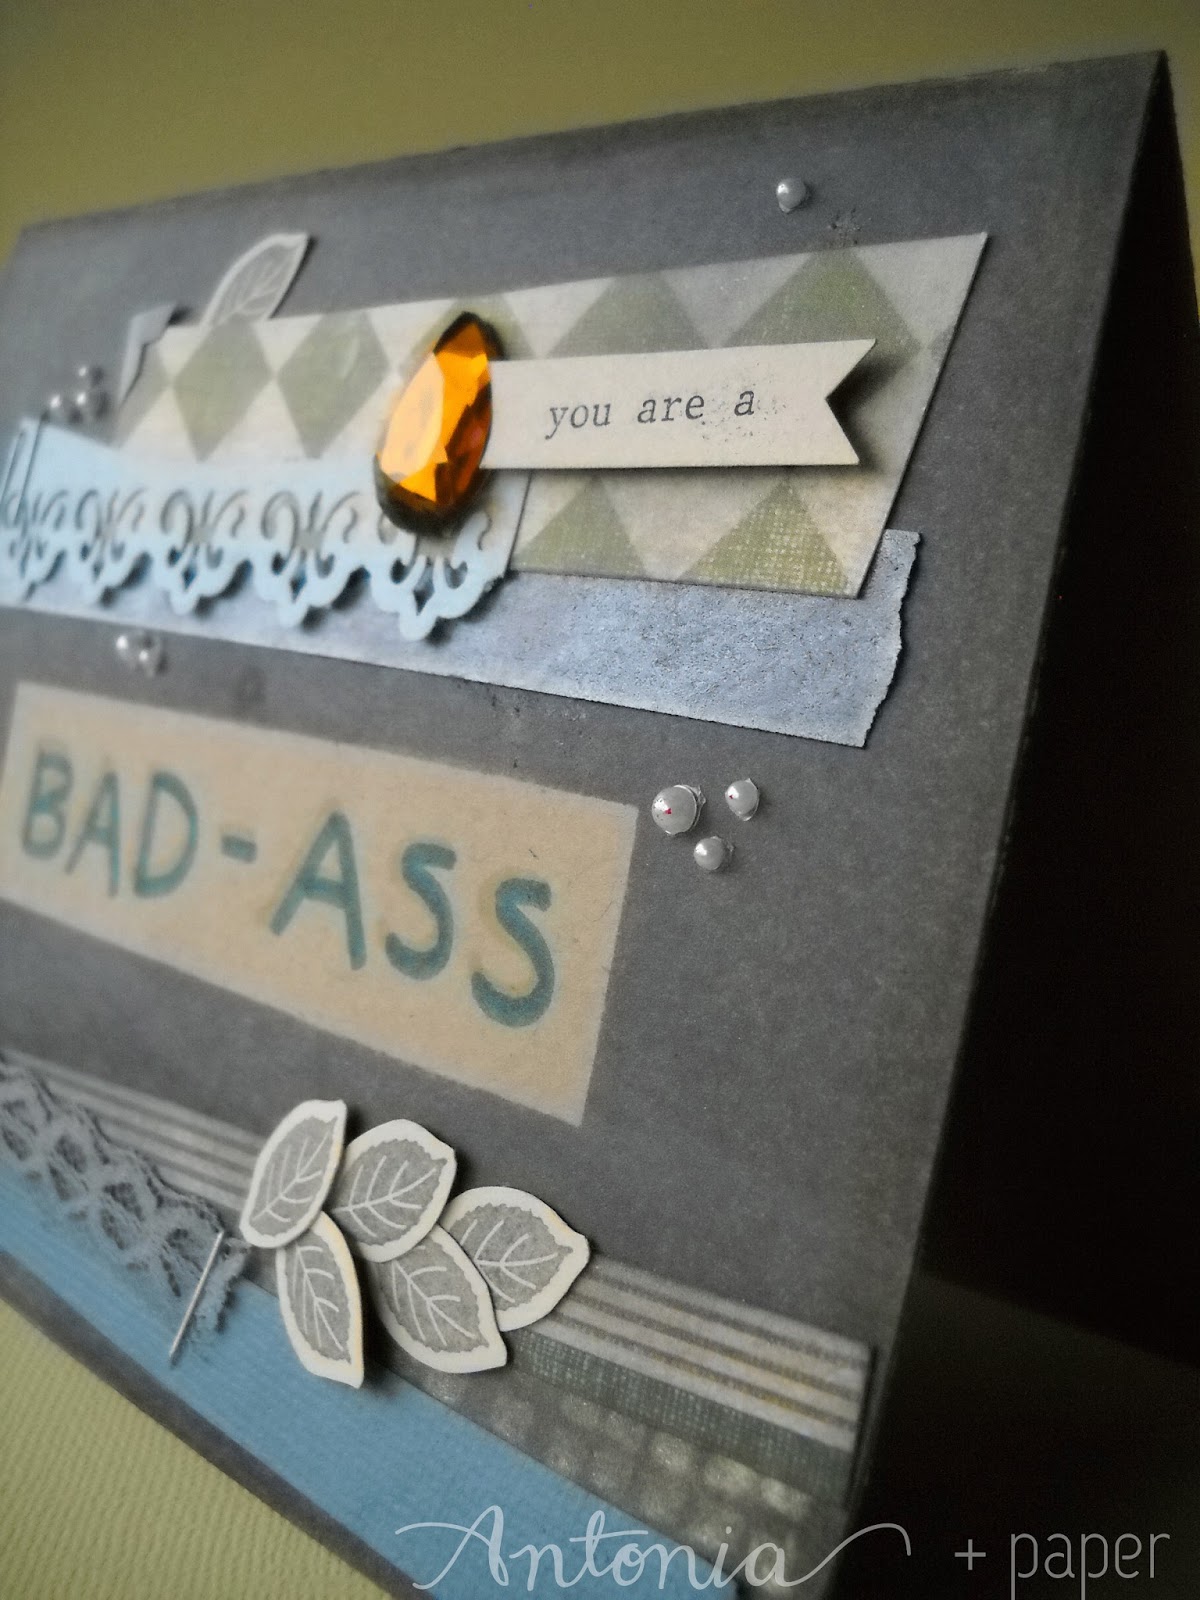


I traced the edge of the gem on the little tag and then cut it out, so I could pop it up on foam tape and still have it hug the gem. Normally I’d just put it behind the gem, but this card has some very interesting dimensional elements and I wanted to continue that theme.


This card and the card I’m posting tomorrow are two variations on badassery. My philosophy is that there are many types of badasses, so it makes sense that there are infinite types of cards for those badasses. Duh. Also this card relieved some of my hunger to make collage cards for a while.


Paper:
Yuletide Joy Paper Pack by the Paper Studio (checked pattern and striped pattern)
Colorbök Paperpad in Cool Earthtones
Artist’s Tape

Inks:

Bling:
Staples
Brown Teardrop Build a Bauble Gem by Prima
Recollections Rhinestone Stickers (Pearl)
Photo Corners made from Dymo Labelling Tape
thrift store gray lace

Glue

Stamp:

Cutting:

Misc:
Typewriter: Xerox 6010 Memorywriter

Wednesday, April 24, 2013

Flip Your Clear Stamps Over

So, it just occurred to me that I could have made that card for my grandmother about a thousand times easier.
This one!
I spent forever masking off part of that long rectangle to avoid a dotted line that was part of the stamp--and I realized today that I should have just flipped that stamp over, or any of my other stamps, and used the back. Duh! Here's a good video by Lisa Spangler explaining this! I wish I had remembered this tip! It's just a little hard to do with non-symmetrical or non-basic stamps, but this would have been perfect here!

Also, new card today! Expect it here soon!

Tuesday, April 23, 2013

Congrats! You Are Really Going Places Card


Since I’ve been listening to a lot of radio shows lately, (for a class I’m in) I’ve been doing more and more coloring, which is where this card came in! (Although don’t necessarily expect a lot more coloring to show up here—I reject a lot of what I color if it’s not quite right!)


I colored the bus first, using Martha Stewart’s Art & Craft Markers. I love this set, but unfortunately, it does not have a lot of very light colors. That color on the roof is one of the lightest! So I used my watercolor brush to tint the windows a bit darker than the paper without competing with the dark brown color.


Once I had finished all of the coloring, (I spent a long time getting some cool shading going with the markers, a lá Copic Markers), I accidentally swiped across the largest van door with the watercolor brush, which softened the whole thing, so I went back, and brushed water over the whole thing. So now it looks a bit splotchy. Oh well!


I hand-lettered the “Congrats!” part of the card, but then I thought it would be super fun to do a little smaller greeting with my typewriter. Unfortunately I miscalculated a little, and had to use three lines to keep the whole thing centered, which put my text right along the bottom edge. I tried to cover it up a bit by accenting the top and sides of the panel with a little gray ink (Colorbox Chalk Ink in Charcoal) and brown ink (Distress Ink in Tea Dye.)

Otherwise, though, I like this card a lot. It makes me laugh, which, I think is the most important thing!

Tools
Typewriter

Wednesday, April 10, 2013

German Happy Birthday Card

So early next week it's my grandmother's birthday! My mom usually asks me a week ahead of time to make a card really quickly and send something, and usually, because she waited so long to ask, I don't make it in time. But this year, I preempted her, and brought it to a family gathering so we could all sign it, even though I live five hours away from home.

Also, important note: my grandmother lives in Germany. So I wrote "Happy Birthday" in German, instead of English.


Because I don't have many stamps that say "Herzlichen Glückwunsch zum Geburtstag," (read: I own ZERO stamps that say that), I decided to write it out by hand. I drew horizontal lines, and prewrote it on scratch paper to find the middle of the writing (and still ended up a little off center, grrr!)

But I don't use the Martha Stewart Peg Stamp Starter Kit stamps very often, and I thought this would be an excellent opportunity to bring a little class to the one-layer stamping.
 I actually thought this could be only a one layer card, but the bright teal of the marker really brings out the printed quality of the black and white so nicely, that I added that in.


I did the stripes by masking off the center writing and stamping with sticky notes, and then very carefully inking up the rectangle stamp from the American Crafts "Thanks" set so that I avoided the dotted line part of the stamp. Then I stamped each line individually! Gah! (I really need to get some background stamps.) As you can tell, I still got some of the dotted line stamped, but I liked the printed quality. It makes it look like an old school printed piece.


Materials:
Recollections Value Pack Cardstock Paper in Kraft
Recollections Value Pack Cardstock Paper in Neutral
Martha Stewart Art & Craft Marker in
Black Pen
Martha Stewart Peg Stamp Starter Kit
American Crafts Thanks Stamp Set
T-square ruler
Tombow Mono Adhesive
Tombow Mono Multi Liquid Glue
Tsukineko Versafine in Onyx Black
Bone Folder
Provocraft Paper Trimmer


Wednesday, April 3, 2013

Deepest Sympathy


This card started out with a totally different look-I had an card where I had had to cut off most of the front of the card, and I was playing with different ways to deal with the wreckage and create a new card-front, when it occurred to me how wonderful and soothing these three blues were!


Then I just cut some organic curves into the shapes, picked a sentiment from Hero Arts, stamped it, cut it into a circle, inked the edges, punched a hole, and attached with some string. Done! Really easy, and really beautiful.

Supplies:
Colorbök Paperpad in Cool Earthtones
Recollections Value Pack Cardstock Paper in Neutral
Fiskars Scissors
Tombow Mono Adhesive Tape runner
Thrift Store String
Antique Hole Punch
Inkssentials Ink Blending Tool
Martha Stewart Crafts Circle Cutter
Hero Arts Everyday Sayings Stamp Set

Tuesday, April 2, 2013

Triangle "Thanks" Card

Hey, everyone! 

Today I'm bringing you the triangles en masse!

Sometimes, fads come and go fairly quickly, but they’re really fun to play with. If you want to keep your budget low, and your stash small, duplicate these patterns by using what you do have a lot of: paper. And your favorite stamps can even create patterns for you.

So this week, I'm doing triangles, a trend I'm seeing quite often!


I’ve been living with less and less pattern paper, the more years I live at college, and that’s never stopped awesome cards. But I still want to play with today’s trends. This card was inspired partially by bold prints in clothes like this, but also there's a triangle die-cut that was released  recently by Simon Says Stamp that I saw all over Wednesday's blog hop that I have been dying to copy. Hence this card!


I originally had glued all of these triangles to my card base and stamped a tiny "thank you" next to it, but then the stamp didn't transfer, I tried to stamp twice, and was off, and was forced to rethink the whole thing. But I like the circles, I think it made the whole thing a little cooler, a little more off-kilter. In my next post, I'll share a card that was inspired by the salvaged remains of the card, even though I ended up actually not using any of the rest of the card!

Supplies:
Recollections Value Pack Cardstock Neutrals (Cream and Gray)
Colorbök Cool Earth Toness & Warm EarthTones (Orange and Green Shapes)
Cutter Bee Scissors
Black Pen
Martha Stewart Simple Circle Cutter
American Crafts Thanks 
Colorbox Fluid Chalk Ink in Charcoal
Tombow Mono Adhesive Dispenser
Bone folder

Tuesday, March 12, 2013

Collage Card: Joy is Yours

Hey guys!

Today I'm bringing you a card I made this weekend! I wasn't actually planning on making this card so soon (I've got a list of trends I want to cover soon here) but then this weekend, I was in my dorm room, and I was just really in the mood for some crafting


I 'm really into this collaging look right now!
 So this week, I've combined two really hot trends in cardmaking right now: collaging and chalkboards.

I really dug deep into my stash of randomness to pull out some of the stuff I have in here. Some of these elements are created with regular stamps and scrapbooking paper, but I pulled a feather out of my stash that I got from a jewelry making class I took about a year ago. I always planned on turning it into an earring or something, but I'm pretty happy with how this worked out. 

The other unusual element here is that sort of kraft-colored strip of paper running underneath the tag. That's actually an unused twist-tie, like the kind you get at grocery stores. A while ago, I stashed that away, thinking it would look really cool.

So today I'm going to talk about Collaging, but check back tomorrow for a explanation for how I created the faux chalkboard look! 

Collaging

This is crazy trending right now. For example Kristina Werner just did a card in her latest post with this sort of look.
And Emily Branch, of Emily Branch Designs does this all the time in her cards too:
Check this card out at her website.
You'll notice that many of these designs often use a lot of horizontal elements. Because cards are such a small canvas to be working on, stacking and overlapping strips of elements makes the collage easier to handle so it doesn't have to take over the entire cardfront.

Then, to break up the visual monotony of a lot of stripes, you can place individual, smaller elements on top of the strips of paper or ribbon.

I think another really good example of accenting stripes with smaller elements to create a collage is Emily's card that she made for a Spread the Love color scheme challenge.
Check out Emily's post here.
Oh, I just love collages. I know my obsession is NOT over yet!

Don't forget to keep an eye out for my explanation of the chalkboard effect I did!


Antonia


Supplies


Provocraft Trimmer
Tombow Mono Multi Liquid Glue
Tombow Adhesive Runner
EK Success CutterBee Scissors
Paper: Colorbök Cool Earth Tones paper (Teal & Dark Gray); Recollections Kraft, Cream & Gray, 
Found Objects: Feather, Twist Tie
Stamp Sets: Hero Arts Clear Design: Everyday Sayings, TPC Studio Hot Air Balloon Collage, American Crafts Stamp Collection: Thanks, Recollections stamp set watches and keys
Punches:Single Hole Punch (1/4 inch), Single Hole Punch (1/8 inch), Marvy Uchida 3/4 inch punch, EK Success Small Butterfly Punch
Recollections Faux Pearl Stickers
Inks: VersaMark, Versafine in Onyx Black, Distress Ink in tea dye, and Colorbox Chalk ink in Charcoal and Colorbox Pigment Ink in Frost White
Inksentials Foam Blending Tool & a baby wipe